Frames
Simple use of DS9 has a single image in the main display area. However, DS9 can load multiple images into memory; each image is a 'Frame'. When multiple frames are loaded, you can display one frame at a time or all of them side by side.
Frames - basic use
| Command: | frame new |
| Menu: | Frames - New Frame |
| Description: | Creates a new frame. If only the single default frame was present, whatever was previously displayed inthe main window is replaced by a blank canvas. Then using the usual File - Open process a new image can be loaded in the frameand displayed. |
There are several modes to view frames.
| Command: | tile yes|no |
| Menu: | Frame - Tile Frames |
| Description: | Displays all the frames at once in a grid in the main image pane.A 'current frame' is still defined, and the Go To Frame commands will select which one. |
Example of two tiled frames
| Command: | tile no |
| Menu: | Frame - Single Frame |
| Description: | This displays a single frame at a time - the `current frame'; this is the default. |
| Command: | single |
| Menu: | Frame - Single Frame |
| Description: | This displays a single frame at a time - the `current frame'; this is the default. |
| Command: | frame frameno [n] |
| Menu: | Frame - Go To Frame - Frame [n] |
| Description: | This will select the nth frame to be the current one. In Single Framemode, it will redisplay this frame. |
| Command: | frame first |
| Menu: | Frame - First Frame |
| Description: | This will make the first frame in the list be the current one. In Single Frame mode, it willdisplay this frame. |
| Command: | frame previous |
| Menu: | Frame - Previous Frame |
| Description: | This will make the previous frame in the list be the current one. In Single Frame mode, it willdisplay this frame. KEYBOARD SHORTCUT: Shift-Tab |
| Command: | frame next |
| Menu: | Frame - Next Frame |
| Description: | This will make the next frame in the list be the current one. In Single Frame mode, it willdisplay this frame. KEYBOARD SHORTCUT: Tab |
| Command: | frame last |
| Menu: | Frame - Last Frame |
| Description: | This will make the last frame in the list be the current one. In Single Frame mode, it willdisplay this frame. |
| Command: | tile grid|column|row |
| Menu: | Frame - Frame Parameters - Tile - Grids|Columns|Rows |
| Description: | This controls the layout of the tiled frames,either as a 2D grid, a single vertical column, or a single horizontal row. |
| Command: | tile grid mode automatic|manual |
| Menu: | Frame - Frame Parameters - Tile - Tile Parameters - Grid - Automatic|Manual |
| Description: | Automatic layour of the frames is the default.In manual mode, the number of grid columns and rows and the gap in pixels between the frames can be controlled. |
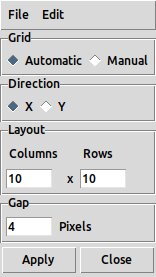
Tile Parameters dialog
| Command: | tile grid direction x|y |
| Menu: | Frame - Frame Parameters - Tile - Tile Parameters - Direction - X|Y |
| Description: | Specifies whether the increment for each new frame is horizontal or vertical (?).The menu variant updates the screen following Frame - Frame Parameters - Tile - Tile Parameters - Apply. |
| Command: | tile grid layout [N M] |
| Menu: | Frame - Frame Parameters - Tile - Tile Parameters - Layout - Column, Rows - [N] [M] |
| Description: | Specifies the number of columns and rows in the grid.The menu variant updates the screen following Frame - Frame Parameters - Tile - Tile Parameters - Apply. |
| Command: | tile grid gap [N] |
| Menu: | Frame - Frame Parameters - Tile - Tile Parameters - Layout - Columns|Rows - [N] |
| Description: | Specifies the gap in pixels between grid frames.The menu variant updates the screen following Frame - Frame Parameters - Tile - Tile Parameters - Apply. |
| Command: | frame move first|back|forward|last |
| Menu: | Frame - Move Frame - First/Backward/Forward/Last |
| Description: | Shuffles the order of the frames in the list |
| Command: | frame show|hide [N] |
| Menu: | Frame - Show/Hide Frames - Frame [N] |
| Description: | Frames can be temporarily hidden with selecting or deselecting frame number n. |
| Command: | frame show|hide all |
| Menu: | Frame - Show/Hide Frames - All |
| Description: | Show or hide all frames at once |
| Command: | frame center |
| Menu: | Zoom - Center Image |
| Description: | Center the current frame on the image center |
| Command: | frame center [n]|all |
| Menu: | - |
| Description: | Center frame n, or center all frames |
| Command: | frame clear |
| Menu: | Frame - Clear Frame |
| Description: | Clears the current frame, replacing the image with a blank canvas. |
| Command: | frame clear [n]|all |
| Menu: | - |
| Description: | Clear numbered frame or all frames |
| Command: | frame refresh |
| Menu: | Frame - Refresh Frame |
| Description: | Updates certain changes to the current frame. |
| Command: | frame reset |
| Menu: | Frame - Reset Frame |
| Description: | Removes certain changes to the current frame. |
| Command: | frame delete |
| Menu: | Frame - Delete Frame |
| Description: | Deletes the current frame, so there is one fewer frame in the list of frames. |
| Command: | frame delete [N] |
| Menu: | - |
| Description: | Deletes the Nth frame, so there is one fewer frame in the list of frames. |
| Command: | frame delete all |
| Menu: | Frame - Delete Frame |
| Description: | Deletes all the frames |
| Command: | movie frame mpeg|gif [DT] blink|fade [filename] |
| Menu: | File - Create Movie - Format - Frames Movie |
| Description: | Creates a movie where multiple DS9 frames are displayed in sequence.Either MPEG or animated GIF formats are available. The GUI version has optionsFile - Create Movie - Type- MPEG|GIF,File - Create Movie - Transition - Blink|Fade andFile - Create Movie - Delay - [DT]. The delay is in units of 0.01s and the default is 0.50s. |
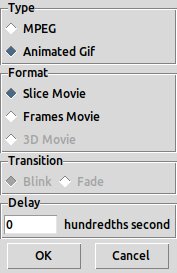
Create Movie dialog
| Command: | match|lock frame wcs |
| Menu: | Frame - Match|Lock - Frame - WCS |
| Description: | Aligns the frames to match the frames to the WCS of the current frame. If lock is used, the frames stay matched as youchange (zoom, pan etc) the current frame. Most useful in Tile Frames mode. |
| Command: | match|lock frame [coordsys] |
| Menu: | Frame - Match|Lock - Frame - [coordsys] |
| Description: | Aligns the frames to match the frames to the given coordinate system of the current frame (WCS, physical, image, WCS a, etc.If lock is used, the frames stay matched as the current one is changed. |
There are an additonal set of commands used with xpaget to query the state of the frame:
| Command: | frame has contour |
| Menu: | - |
| Description: | Does the frame have contours. |
| Command: | frame has contour aux |
| Menu: | - |
| Description: | Does the frame have auxiliary contour information. |
| Command: | frame has fits |
| Menu: | - |
| Description: | Does the frame have a FITS dataset loaded |
| Command: | frame has fits bin|cube|mosaic |
| Menu: | - |
| Description: | Does the frame have a FITS binary table, cube or mosaic loaded |
| Command: | frame has marker highlite|paste|select|undo |
| Menu: | - |
| Description: | Does frame have certain states set |
| Command: | frame has [coordsys] |
| Menu: | - |
| Description: | Example: 'xpaget ds9 frame has physical' - does the frame have a physical coord system. |
| Command: | frame has system [coordsys] |
| Menu: | - |
| Description: | Example: 'xpaget ds9 frame has system physical' - does the frame have a physical coord system. |
| Command: | frame has wcs [coordsys] |
| Menu: | - |
| Description: | Example: 'xpaget ds9 frame has wcs wcsp' - does the frame have a wcs 'p' coord system. |
Crosshair
| Command: | mode crosshair |
| Menu: | Edit - Crosshair |
| Description: | Displays a crosshair in each frame. The user can use the mouse (left click and drag) to move the crosshair in the current frame. |
| Command: | match|lock crosshair [coordsys] |
| Menu: | Frame - Match|Lock - Crosshair - WCS |
| Description: | If in crosshair mode, will let the user move the crosshair and then click, in the current frame and the crosshairs in the other frames jumpto the corresponding WCS-matched position. If lock is used, the frames stay matched as you move the crosshair.That is, the crosshairs in the other frames dynamically follow the WCS position of the crosshair in the current frame. |
| Command: | mode crosshair |
| Menu: | Edit - Crosshair |
| Description: | In Crosshair mode, a crosshair will be superimposed on the imageand the left mouse button will move the location of the crosshair.Clicking will make the crosshair jump to the mouse position. |
| Command: | crosshair [x] [y] [coordsys] [skyframe] |
| Menu: | - |
| Description: | Command the crosshair to a given position. Examples:crosshair 100 100 physicalcrosshair 23:01:00 +58:52:51 wcs fk5 |
Simple frames - advanced operations
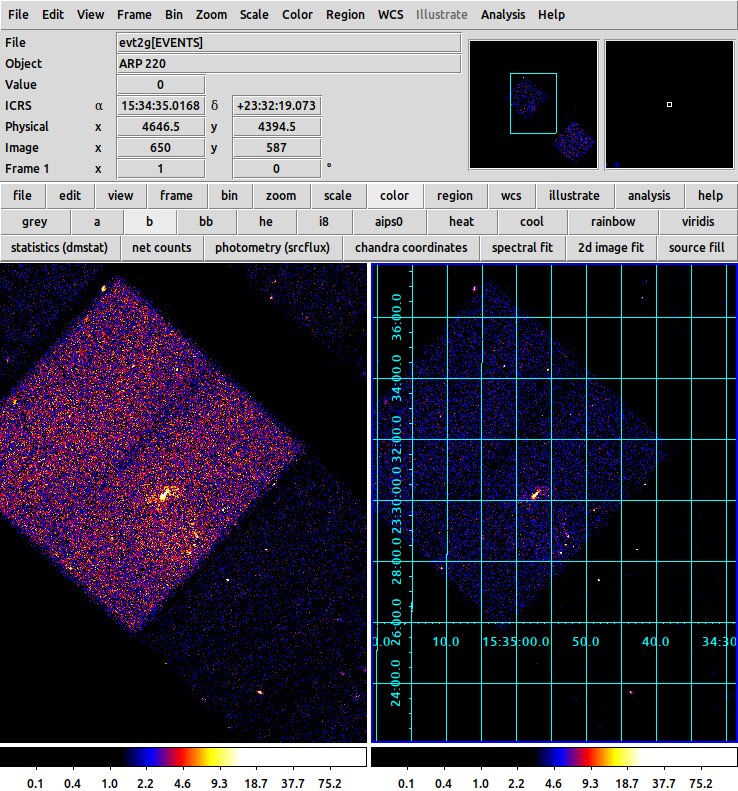
Tile Frames is usually most useful for these. While a set of different coordinate systems are supported, WCS (the default WCS of the data in the current frame, usually RA/Dec) is usually what you want.
| Command: | mode crop |
| Menu: | Edit - Crop |
| Description: | Selects crop mode. A left mouse click followed by dragging and release will define a rectangle in the current frame. On release, the image will be cropped to this rectangle. |
| Command: | match|lock crop [coordsys] |
| Menu: | Frame - Match/Lock - Crop - [coordsys] |
| Description: | If crop mode is selected, this willmake the cropped area in the other frames match the one in the current frame. |
| Command: | crop match|lock [coordsys] |
| Menu: | - |
| Description: | Same as the above |
| Command: | bin match|lock |
| Menu: | Frame - Match/Lock - Bin |
| Description: | makes the binning of other frames match the binning of the current frame. |
| Command: | block match|lock |
| Menu: | Frame - Match/Lock - Block |
| Description: | makes the blocking of other frames match the binning of the current frame. |
| Command: | colorbar lock |
| Menu: | Frame - Match/Lock - Colorbars |
| Description: | Locks the frame colorbars to that of the current frame. |
| Command: | match|lock scale |
| Menu: | Frame - Match/Lock - Scale |
| Description: | Locks the frame scales. |
| Command: | match|lock scalelimits |
| Menu: | Frame - Match/Lock - Scale and Limits |
| Description: | Locks the frame scales and min/max values. |
| Command: | match|lock smooth |
| Menu: | Frame - Match/Lock - Smooth |
| Description: | Locks the frame smoothing functions |
| Command: | match|lock axes |
| Menu: | Frame - Match/Lock - Axes Order |
| Description: | Locks the axes order for 3D frames. |
| Command: | match|lock 3d |
| Menu: | Frame - Match/Lock - 3d |
| Description: | In the case where Edit - 3d mode is selected,allows user rotation of the current frame to drive the rotation of other frames. |
Color (RGB/HSV/HLS) frames
A color frame displays a 3D color image with three separately addressable color channels. DS9 supports three color models using different triples of color coordinaes to describe the color: RGB (red, green, blue); HSV (hue, saturation, value); HLS (hue, lightness, saturation). I will descibe the RGB cases; HSV and HLS cases are parallel.
A FITS RGB image on disk may be three separate FITS image files, one FITS file with three extensions, or as a FITS 3D n x n x 3 data cube, with three slices, each representing the red, green, and blue channel. A FITS RGB image may be loaded all a one time, or one channel at a time. Once loaded, the multiple FITS images are treated as one FITS image.
Example:
ds9 -rgb -red r.fits -green g.fits -blue b.fits # rgb image from 3 fits images
ds9 -rgbimage rgb.fits # load rgb image consisting of one fits file with 3 image exts
ds9 -rgbcube cube.fits # load rgb image consisting of one fits data cube
You can open an RGB frame and populate it with data from red, green and blue files from the DS9 command line by
ds9 -rgb -red red.fits -green green.fits -blue blue.fits
For HSV and HLS the equivalent commands are
ds9 -hsv -hue  h.fits  -saturation s.fits -value v.fits
ds9 -hls -hue  h.fits  -lightness l.fits -saturation s.fits
| Command: | rgb|hsv|hls |
| Menu: | Frame - New Frame RGB/HSV/HLS |
| Description: | Creates a new RGB/HSV/HLS frame.The frame has three image planes, one for each of the color coordinates. |
| Command: | frame new rgb |
| Menu: | Frame - RGB |
| Description: | Pops up an RGB control window which allows one of the three coordinates to beselected as 'current', and to view or hide each of the three coordinates. By default all threecoordinates red, green, blue are visible, making a color image, but it can be convenient to switchtwo of them off to see just one of the color planes. (HSV, HLS similar) |
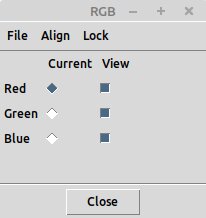
Popup dialog to control the red, green, blue frames
| Command: | rgb red|green|blue |
| Menu: | Frame - RGB - Current - Red|Green|Blue |
| Description: | Select red, green or blue as the current RGB channel |
| Command: | rgb red|green|blue [filename] |
| Menu: | File - Open |
| Description: | Load a file into the current RGB channel.To load an RGB image in the GUI:Select 'red' as current and execute File - Open to load a file in the red channel.Then select 'green' as current, and again File - Open to load the green file;then select 'blue' as current, and again File - Open to load the blue file.On the command line, you can dods9 -rgb -rgb channel red -fits e.red -rgb green -fits e.green -rgb blue -fits e.blueor more simplyds9 -rgb -red foo.red -green -foo.green -blue foo.blueNote thatds9 -rgb red foo.red -rgb green foo.green -rgb blue foo.blueloads into three separate frames because you haven't created a new RGB frame. |
| Command: | rgb channel red|green|blue |
| Menu: | Frame - RGB - Current - Red|Green|Blue |
| Description: | 'rgb channel red' is the sameas 'rgb red'. You can then load a file in the channel |
| Command: | rgb view red|green|blue yes|no |
| Menu: | Frame - RGB - View - Red|Green|Blue |
| Description: | Select or deselect thegiven RGB channel to make the relevant data visible or not. |
| Command: | rgbarray filename[opts] |
| Menu: | File - Import - RGBArray |
| Description: | Load a raw data array cube into an RGB frame.Example: xpaset -p ds9 rgbarray foo.arr[dim=512,zdim=3,bitpix=-32,endian=little] |
| Command: | rgbarray new filename[opts] |
| Menu: | File - Import - RGBArray |
| Description: | Load a raw data array cube into a new RGB frame.Example: xpaset -p ds9 rgbarray foo.arr[dim=512,zdim=3,bitpix=-32,endian=little] |
| Command: | rgbcube [new] [filename] |
| Menu: | File - Open As - RGB Cube |
| Description: | Load a FITS RGB cube into an existing or new RGB frame |
| Command: | rgbimage [new] [filename] |
| Menu: | File - Open As - RGB Image |
| Description: | Load a FITS RGB image into an existing or new RGB frame. |
| Command: | save rgbcube [filename] |
| Menu: | File - Save As - RGB Cube |
| Description: | Write out RGB frame as a FITS file with an N x M x 3 cube in the primary array. |
| Command: | save rgbimage [filename] |
| Menu: | File - Save As - RGB Image |
| Description: | Write out RGB frame as a FITS file with a null primary and 3 image extensions (r,g,b) |
| Command: | view rgb red|green|blue yes|no |
| Menu: | - |
| Description: | Display the RGB values of the current pixel in the DS9 info pane |
| Command: | - |
| Menu: | Frame - RGB - Align - (coordsys) |
| Description: | Aligns the frame based on the given coordinate system;Image is the default, but WCS may be useful. |
| Command: | rgb lock [option] |
| Menu: | Frame - RGB - Lock |
| Description: | Lets you lock the R, G, B frames on any of the following:wcs, crop, slice, bin, axes, scale, scalelimits, block, smooth.See the single-frame case for more explanation.By default each of the frames has indepdendent bin, scale, smoothing and colorbar but Lockallows them to be locked together so changes affect all the frames at once. |
For an event list, you can load the same event list into each of the R, G, B frames and then on each of the frames use Bin - Binning Parameters - Bin Filter followed by Bin - Binning Parameters - Apply to apply different energy filters (e.g. 'energy=500:1000', 'energy=1000:2500', 'energy=2500:7000') to each of the frames, to generate an RGB 'true X ray color' image.
3D mode
There are two ways of viewing a data cube: you can load a 3D image into a regular 2D frame and step through 'slices' in the z direction one at a time, or you can use a 3D frame which implements a simple ray-tracing method to view a cube from different angles.
The 3D module implements a simple ray-trace algorithm. For each pixel on the screen, a ray is projected back into the view volume, based on the current viewing parameters, returning a data value if the ray intersects the FITS data cube. To determine the value returned, there are 2 methods available, Maximum Intensity Projection (MIP) and Average Intensity Projection (AIP). MIP returns the maximum value encountered, AIP returns an average of all values encountered. At this point, normal DS9 operations are applied, such as scaling, clipping and applying a color map.
Rendering time is independent of the actual data cube size. Instead, the time it takes to render is based on how many rays are needed to project the data cube upon the screen in the view volume and the current zoom factor. The new module requires no special hardware or graphical processor unit (GPU) and the rendering time is adequate for interactive GUI manipulation on most computers. The rendering engine is developed using the POSIX thread library, allowing multiple light weight processes to be spawned to complete an image in parallel. The number of threads actually generated is a user specified parameter. Since all modern hardware contain multiple CPU cores, the default value is 8 threads. For larger work stations, this number can be increased. For every doubling in the number of CPU cores available, rendering times decrease approximately 75%.
Example:
    # create 3d frame, load fits file
    # set view angle to az 45 el 30 deg
    # set rendering method to Average Intensity Projection

    % ds9 -3d mycube.fits-3d vp 45 30-3d method aip

    % xpaset -p ds9 3d
    % xpaset -p ds9 file mycube.fits
    % xpaset -p ds9 3d vp 45 30
    % xpaset -p ds9 3d method aip
All 2-D graphics, regions, cross hairs, contours, and coordinate grids, are applied to the current slice, which is selected by the user. When the user wishes to match or lock a 2-D image and to a 3-D data cube, the current slice is used to determine the rendering solution. The user can crop the data cube for all 3 axes via the command line or the GUI. The new module also supports FITS event files binned into a data cube.
All printing support has been extended to the new 3-D module. The user may generate 3-D images in Postscript, JPEG, TIFF, and other formats, just as in the 2-D case. Furthermore, native printing is supported for the Windows version.
DS9 analysis macros have been enhanced to fully support the new 3-D module, allowing the user to invoke external analysis tasks based on the current view parameters and to return results back into DS9 in the form of text, plot, 2-D image, or 3-D image.
| Command: | 3d |
| Menu: | Frame - New Frame 3D |
| Description: | Loads a 3D image in a new frame.This displays a 2D projection of the data cubeand pops up the Frame - Cube dialog, which allows you to select which slice in the 3rd dimension is being displayed. |
| Command: | frame new 3d |
| Menu: | - |
| Description: | Equivalent to the 3d command. |
You can choose a slice statically with First, Previous, Next, Last, or an explicit numeric value. You can also choose Play (and Stop) to make DS9 cycle through the cube repeatedly.
| Command: | cube open|close |
| Menu: | Frame - Cube |
| Description: | Open the Cube dialog window. |
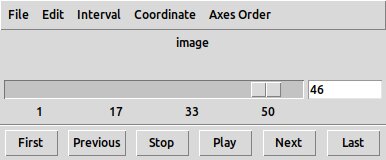
Cube dialog
| Command: | cube play|stop |
| Menu: | Frame - Cube - Play|Stop |
| Description: | Cause DS9 to start or stop cycling through the slices |
| Command: | cube first|last |
| Menu: | Frame - Cube - First|Last |
| Description: | Cause DS9 to go to the first or last slice |
| Command: | cube prev|next |
| Menu: | Frame - Cube - Previous|Next |
| Description: | Cause DS9 to go to the previous or next slice.KEYBOARD SHORTCUT: + (next slice); - (previous slice). |
| Command: | cube [value] |
| Menu: | Frame - Cube - [value] |
| Description: | Cause DS9 to go to the selected slice |
| Command: | cube interval [value] |
| Menu: | Frame - Cube - Interval |
| Description: | Allows you to choose the time interval between slices in Play mode (default is 1 s). |
| Command: | cube order [abc] |
| Menu: | Frame - Cube - Axes Order |
| Description: | Allows you to select which 2 axes are used as x,y for the projection and which axis is used for the third dimension z (slice direction).Example: cube order 132 |
| Command: | cube axis [number] |
| Menu: | |
| Description: | Specify the 3rd axis to use in the case of a 4 or higher dimension axis dataset. Example: xpaset -p ds9 cube axis 3 |
| Command: | cube match|lock wcs |
| Menu: | - |
| Description: | Match or lock cube frames |
The Frame - Cube - Coordinate menu allows control over whether image coordinates or WCS coordinates are displayed.
If you select Edit - 3D mode, when a 3D image is loaded, an additional dialog pops up, the 3d dialog. You can now grab the image with the left button and rotate it interactively in 3D space.
| Command: | 3d open |
| Menu: | Frame - New Frame 3D |
| Description: | Opens a new 3D frame. Frame - 3D opens a control dialog. |
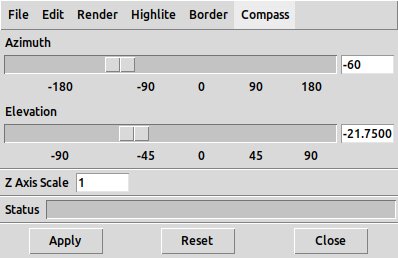
3D control dialog
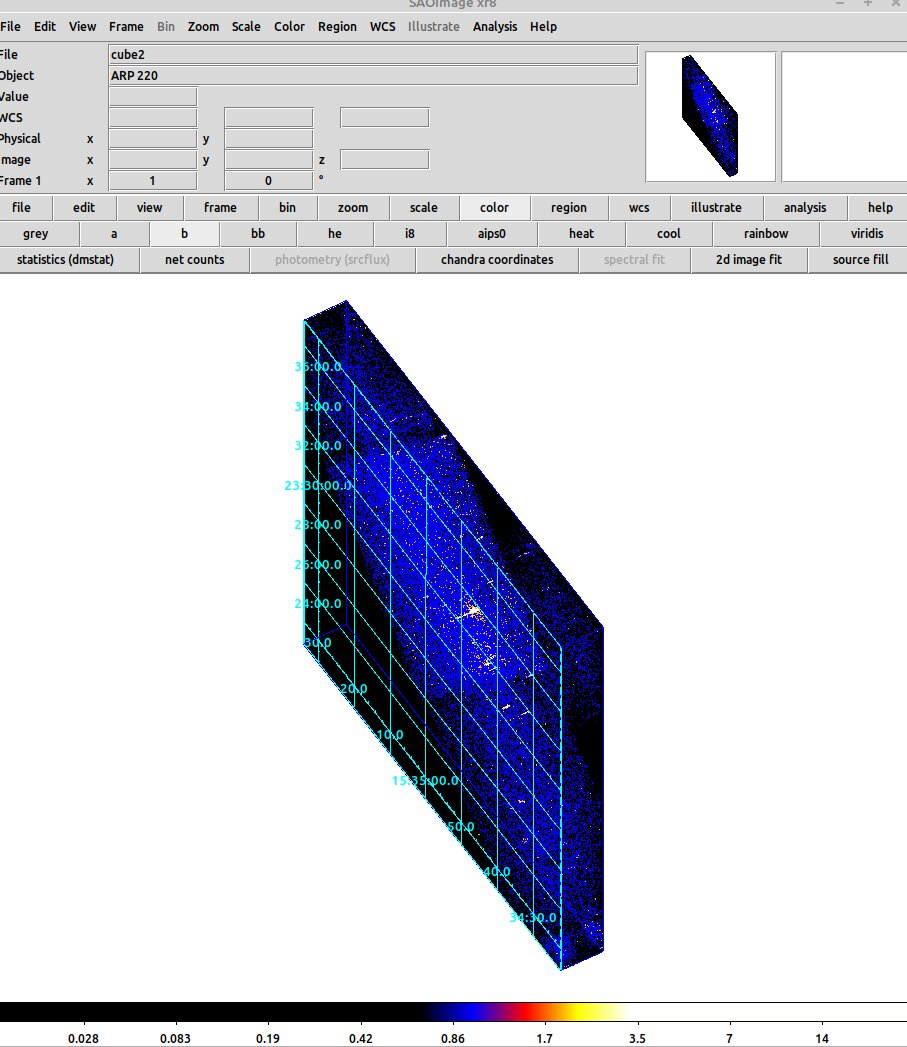
3D frame example
| Command: | 3d close |
| Menu: | Frame - 3D - Close |
| Description: | Closes the 3D frame |
| Command: | 3d az [value] |
| Menu: | 3d - Azimuth |
| Description: | Control azimuth of the cube's orientation, deg. |
| Command: | 3d el [value] |
| Menu: | 3d - Elevation |
| Description: | Control elevation of the cube's orientation, deg. |
| Command: | 3d scale [value] |
| Menu: | 3d - Z Axis Scale |
| Description: | Control the Z axis scale - default 1.Allows you to stretch or shrink the scale on which the z axis is rendered. |
| Command: | 3d method mip|aip |
| Menu: | 3d - Render - MIP|AIP |
| Description: | Optimize the 3D rendering. The MIP mode causes the maximum valuealong a projected ray to be displayed, while AIP mode takes the average value along the ray. |
| Command: | 3d background none|azimuth|elevation |
| Menu: | 3d - Render - None|Azimuth|Elevation |
| Description: | The Azimuth and Elevation options cause the renderer to precalculate and cache the image seen at different orientations. |
| Command: | 3d border yes|no |
| Menu: | 3d - Border - Show |
| Description: | Controls visibility of the cube border, outlined in blue by default. |
| Command: | 3d highlite yes|no |
| Menu: | 3d - Highlight - Show |
| Description: | Controls visibility of the highlighting of the current slice, outlined in cyan by default. |
| Command: | 3d border|highlite color [value] |
| Menu: | 3d - Border|Highlite - Color |
| Description: | Allows you to set the color used to outline the border or the highlighting of the current slice. |
| Command: | 3d compass yes|no |
| Menu: | 3d - Compass - Show |
| Description: | Controls the display of an axis triad drawn at the origin,which can help the user understand the current orientation as they move the image around. |
| Command: | 3d compass color [value] |
| Menu: | 3d - Compass - Color |
| Description: | Sets the color of the 3d compass axis triad. |
| Command: | 3d match |
| Menu: | Frame - Match - 3d |
| Description: | Matches the orientation of multiple 3d frames |
| Command: | 3d lock yes|no |
| Menu: | Frame - Lock - 3d |
| Description: | Matches and locks together the orientation of multiple 3d frames, so you can rotate one and the others follow in sync |
| Command: | match|lock slice [coordsys] |
| Menu: | Frame - Match/Lock - Slice - WCS/Image |
| Description: | Locks the selected slice for multiple 3D frames. |
| Command: | crop 3d zmin zmax [coordsys] |
| Menu: | - |
| Description: | Crop a 3D image to a given range in the 3rd axis. The zmin and zmax values are given in the given coordsys, e.g. 'crop 3d 0.25 0.50 wcs' |
| Command: | mode crop |
| Menu: | Edit - Crop |
| Description: | For a 3D frame, there are additional mouse functions in crop mode.Shift-drag will move the front crop plane forward; control-drag will move the back crop plane backward. |
| Command: | - |
| Menu: | [shape] - Analysis - Plot2D |
| Description: | Double clicking on a region brings up the region shape dialog.This region shape menu option generates a popup plot of the data within the region allowing you to scan through slices. |
| Command: | - |
| Menu: | Region - Region Parameters - AutoPlot3D |
| Description: | If this is set, the data plot is popped up automatically at region creation. |
| Command: | - |
| Menu: | Edit - Preferences - 3d - Render - Background |
| Description: | Allows you to select 'none', 'Azimuth', or 'Elevation' as being in the background for the render, for improved performance |