Preamble
This document provides a detailed technical description of the SAOImageDS9 ("DS9") interface, its internal design, usage instructions, supported file formats, and customization options. It is intended for developers, astronomers, and advanced users who require in-depth knowledge of DS9’s features and internal workings. The content covers historical development, build instructions, user interface components, command-line operations, data handling, coordinate systems, region definitions, and interoperability with other tools.
While every effort has been made to ensure accuracy and completeness, errors or omissions may remain. If you encounter any mistakes, unclear explanations, or outdated information, please report them to cxchelp@cfa.harvard.edu so we can continue improving this resource.
The DS9 main window
DS9 commands
DS9 can be controlled in three ways. Normally the application is controlled by the GUI menus. Menu items are represented in this document with the notation Menu - Submenu - Item.
DS9 also has a command language. The DS9 CL can be used to control DS9 from the unix command line with XPA commands, setting DS9 parameters and returning them:
unix> xpaset -p ds9 [command] [value]
unix> xpaget ds9 [command]
The same commands can also be used on the initial DS9 startup command line, in which case they are executed in sequence from left to right. A name with no preceding command is interpreted as a file to open.
unix> ds9 image.fits
unix> ds9 -[command1] [value1] -[command2] [value2] image.fits  -[command3] [value3] ...
In this document commands are denoted with command [value].
Normal startup
The core functionality of DS9, and probably the most common way that DS9 is used, is to display and analyse a 2 dimensional astronomical image file in FITS format. We suppose that the path to the file is /mydata/image.fits. Then on the command line the user types
ds9 /mydata/image.fits
If present, DS9 reads a user-customization startup file $HOME/.ds9.ini contaning TCL commands (see 'startup file')
ds9 then starts up and opens its main window. This window has a number of panes including the image pane which shows the displayed image. I describe these in the default 'horizontal' configuration of ds9 but other configurations are possible, from top to bottom:
- Top row: The main menu bar, at top. (for Mac this may be separate at the top of the screen?)
- Second row left: The info panel, showing in particular the coordinates of the image cursor
- The panner panel, to the right of the info panel, showing a broad context view
- The magnifier panel, to the right of the panner panel, showing a magnified view around the cursor position
- Third row: Menu button bar array. This region contains a set of convenience buttons that replicate the main menu bar. There are two or more rows of buttons; the top row has the menu names from the main menu bar. Pressing one of these buttons populates the additional rows of buttons with selected menu items from that menu. At startup, 'file' is selected and the second row has entries from the file menu.
- Fourth row: The image display frame pane, with a color image display showing the image pixels, with color depending on the image pixel value (usually corresponding to intensity). The position of the cursor within the image panel drives the values in the second row panels. In general only a portion of a large image is displayed at any one time (initially the central part).
- Fifth row: The colorbar, by default below the image frame, showing the colors corresponding to different pixel values.
User actions can generate popup windows of various kinds, and menus can be torn off to make separate windows, but the main window is where most of the action is for the typical DS9 user.
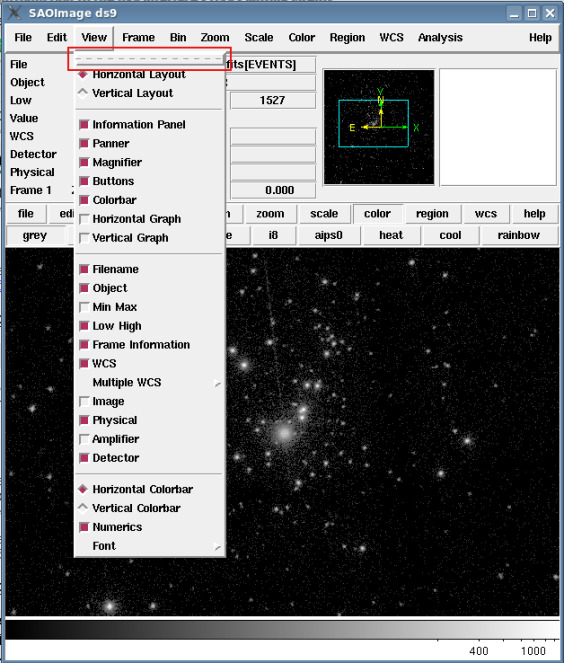
To `tear off' a menu, click on the dashed line before the first menu entry
Additional image frames can be created with Frame - New Frame (see the section on Frames). Each frame has its own colorbar. Frame - Tile Frames causes all currently defined frames to be simultaneously displayed side-by-side with each other. These commands are discussed in more detail in the section on frames.
There are four relevant subsets of the displayed image:
- The full image
- The part of the image DS9 has in memory at the moment (`memory image'). This is displayed in the panner window. This may be the full image, but for larger images it will not be; it can be controlled in the 'bin' menu.
- The part of the image displayed in the currently selected display frame ('display image').
- The part of the image displayed in the magnifier ('magnify image').
DS9 supports a number of operations on the displayed image - binning/blocking, cropping, smoothing, scaling, color-mapping, zooming and panning. The operations are applied in the order shown in the following figure:

Order of applying imaging operations
Layouts
The `View' menu allows the user to select different DS9 layouts.
| Command: | view layout horizontal |
| Menu: | View - Horizontal |
| Description: | Selects the default view described above. |
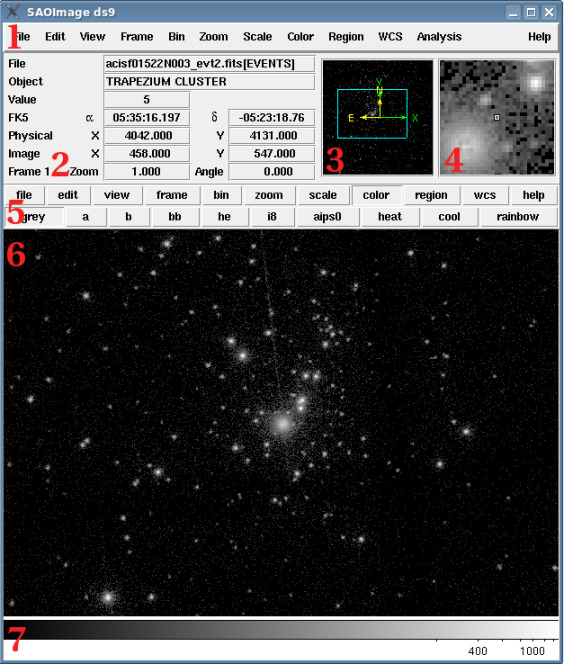
DS9 in horizontal mode
| Command: | view layout vertical |
| Menu: | View - Vertical |
| Description: | InVertical mode, a left hand column of panels has magnifier at the top,the info bar below that, and the panner at the bottom. A second columnhas the menu button array. The main image window is to the right.The main menu bar remains at the top. |
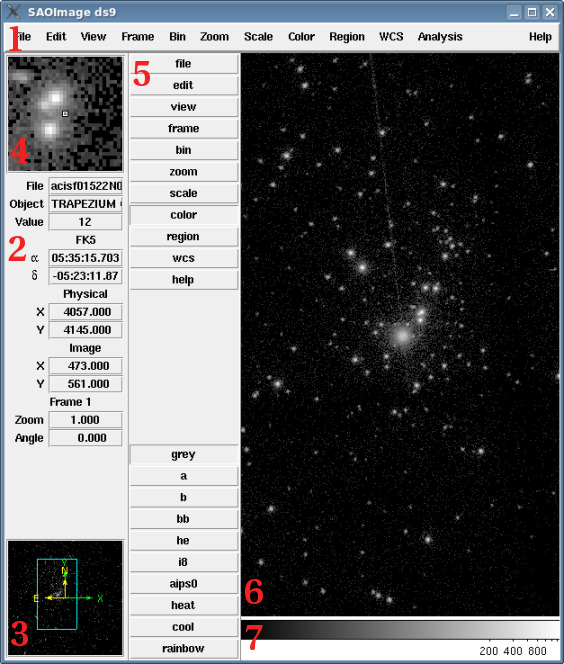
DS9 in vertical mode
| Command: | view layout basic |
| Menu: | View - Basic |
| Description: | InBasic mode, the magnifier, panner, info bar and menu button array are not displayed. |
| Command: | view layout advanced |
| Menu: | View - Advanced |
| Description: | InAdvanced mode, the main image window is at left,a middle column has, from top to bottom, panner, magnifier, and info bar, andthe menu button array is at right. |
| Command: | view icons yes|no |
| Menu: | View - Icons |
| Description: | In Advanced mode only, if View - Icons is selected, rows of icon buttonsappear at top, left and bottom |
| Command: | view colorbar yes|no |
| Menu: | View - Colorbar |
| Description: | Controls whether or not the colorbar is displayed. |
| Command: | colorbar yes|no |
| Menu: | - |
| Description: | Equivalent to 'view colorbar'. |
| Command: | colorbar orientation horizontal|vertical |
| Menu: | Color - Colorbar - Orientation - Horizontal|Vertical |
| Description: | The colorbar for each of the frames can be at the bottom or the side of each frame. |
| Command: | height [value] |
| Menu: | - |
| Description: | Sets the height of the main image window. Example: xpaset -p height 512 |
| Command: | width [value] |
| Menu: | - |
| Description: | Sets the width of the main image window. |
| Command: | iconify yes|no |
| Menu: | - |
| Description: | Iconfiy the DS9 main window |
| Command: | lower|raise |
| Menu: | - |
| Description: | Lower or raise the DS9 main window in the OS window manager stacking hierarchy. This may or may not work depending on the window manager/OS |
Command line
The SAOImageDS9 command line in general is of the form
ds9 infile -opt1 value1 -opt2 value2 ... -optn valuen
The options are executed one at a time in the order they appear on the command line.
For example, to load an X-ray event list, bin and scale the image, change the colormap, draw contours and save them one might use
ds9 acisf05005N002_evt2.fits -bin about 3800 3800 -bin factor 2 \
    -scale log -cmap b \
    -contour yes -contour limits 1 100 \
    -contour smooth 5 -contour nlevels 6 -contour save ds9.con &
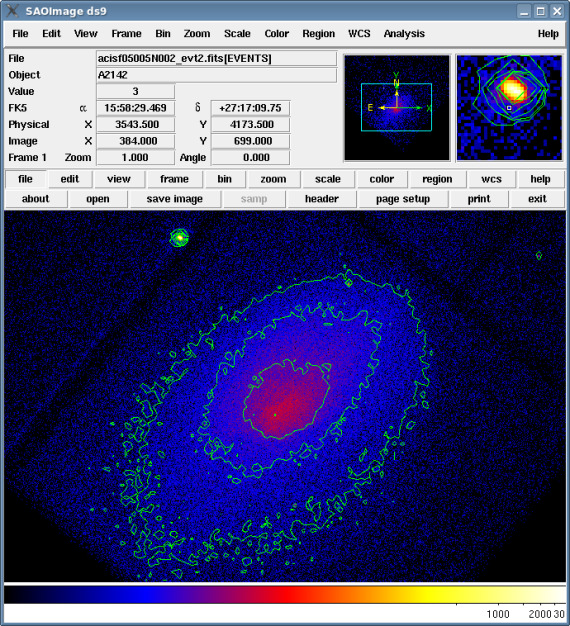
Result of the first example contouring command line
An even more complicated example additionally retrieves an optical image and copies the contours:
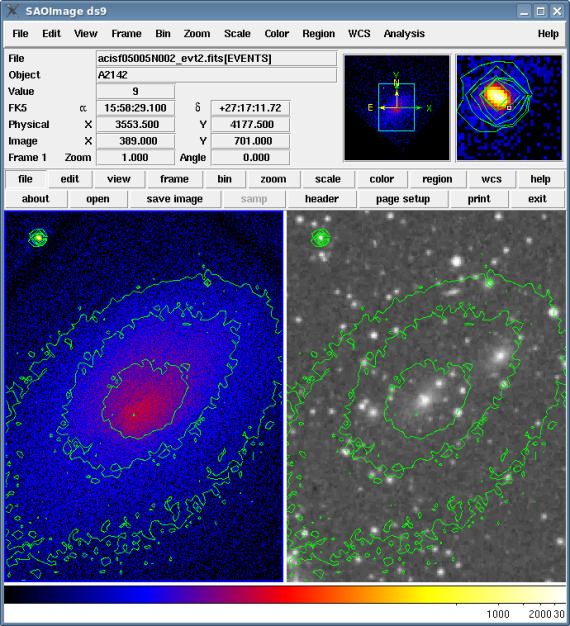
Result of the second example contouring command line
ds9 acisf05005N002_evt2.fits -bin about 3800 3800 -bin factor 2 \
    -scale log -cmap b \
    -contour yes -contour limits 1 100 \
    -contour smooth 5 -contour nlevels 6 -contour copy \
    -dsssao A2142 -cmap grey -contour paste \
    -frame first -match frames wcs &
These options direct DS9 to:
| 1 | bin about 3800 3800 | center the image display at (x,y)=(3800,3800) |
| 2 | bin factor 2 | bin the data by a factor of 2 |
| 3 | scale log | set the display to log scale |
| 4 | cmap b | use the ``b'' colormap |
| 5 | contour yes | display contours |
| 6 | contour limits 1 100 | set the minimum and maximum contour limits |
| 7 | contour smooth 5 | set contour smoothness to 5 |
| 8 | contour nlevels 6 | create six contour levels |
| 9 | contour copy | copy the x-ray contours |
| 10 | dsssao A2142 | retrieve a DSS image of A2142 from the DSS-SAO server (there are also ``dsseso'' and ``dssstsci'' options) |
| 11 | cmap grey | use the ``grey'' colormap in the DSS frame |
| 12 | contour paste | paste the x-ray contours onto the optical data |
| 13 | frame first | select the first DS9 frame |
| 14 | match frames wcs | match the WCS of the DSS frame to the current (x-ray) frame |
Main window default behaviour
- As the user moves the cursor in the main window, the info panel updates the coordinates and values
shown.
- "Value" gives the value of the pixel the cursor is currently over.
- "Image" gives the pixel number the cursor is over. For a 1024 x 1024 image, the pixel number runs from 1 to 1024 on each axis. In addition, there are two derived coordinate values using the WCS (world coordinate system) metadata read from the FITS file header.
- "Physical" coordinates are usually the original instrument pixel coordinates. They are often the same as image coordinates, but for example the user may have rebinned the image by some factor so that one image pixel corresponds to, say, 4 x 4 original instrument pixels, and the metadata preserves that mapping.
- "WCS" (or "World") coordinates are usually the celestial coordinates (RA and Dec) of the location on the sky corresponding to that pixel. The transformation between physical coordinates and world coordinates may be one of a number of nonlinear mappings; the tangent point transformation is the most common one in optical astronomy. DS9 uses the WCS metadata to dynamically compute and update the world coordinates as you move the cursor around the image.
At the same time, the magnify image shown by the magnifier window is updated to follow the cursor position. The panner window is not affected.
- The action of the left mouse button depends on the 'edit mode'.
The edit mode is 'none' by default but many users prefer to select
'region' mode (which used to be the default many years ago). In region
mode, if you click left button and then drag while holding down the
button, a 'region' is defined and displayed on the image pane. The
default here is that the region shape is a circle, centered on the
position that you intially clicked, and dragging the mouse then changes
the radius, which is fixed once the button is released. The region may
then be saved for later use using the Region/Save menu.
Other edit modes are described in later sections.
- Holding down the middle button allows the user to drag the display image around,
showing a different section of the memory image as the display image;
e.g. dragging to
the left causes the rightward portion of the memory image to be displayed.
- Holding down the right button and moving the mouse around dynamically changes the colormap; left-right movements change the bias and up-down movements change the scale.
Panner window
The panner window displays the memory image, with a rectangle superimposed indicating the subset corresponding to the main-pane display image and a 1-pixel cursor showing the current cursor location.
Dragging the rectangle using the left button will move the display image within the memory image, with the main image pane dynamically updating.
By default a 'compass' showing arrows indicating both the X and Y physical-axis directions in cyan and the N and E celestial directions in yellow is superimposed on the panner image.
| Command: | view panner yes|no |
| Menu: | View - Panner |
| Description: | Controls whether the panner window pane appears or not. |
| Command: | - |
| Menu: | Edit - Preferences - Panner - Show Compass |
| Description: | Controls whether or not the 'compass' is displayed. Takes effect after restart. |
Magnifier window
The magnifier window displays a small region centered on the main-window location of the cursor, at higher magnification. There is no mouse action available in the magnifier window, and the window blanks if you move the cursor out of the main window.
| Command: | view magnifier yes|no |
| Menu: | View - Magnifier |
| Description: | Controls whether the magnifier window pane appears or not. |
| Command: | magnifier zoom [N] |
| Menu: | Edit - Preferences - Magnifier - Magnification |
| Description: | Controls magnification level. Values of 1, 2, 4, 8 and 16 are available. |
| Command: | magnifier cursor yes|no |
| Menu: | Edit - Preferences - Magnifier - Show Cursor |
| Description: | If this option is selected (on by default),at the center of the magnifier image is shown a small square indicating the cursor position. |
| Command: | magnifier color [color] |
| Menu: | Edit - Preferences - Magnifier - Color - [color] |
| Description: | Controls the color of the cursor in the magnifier |
| Command: | magnifier region yes|no |
| Menu: | Edit - Preferences - Magnifier - Show Graphics |
| Description: | Selects whether the magnifier image also shows region outlines and other overlay graphics copied from the main window. |
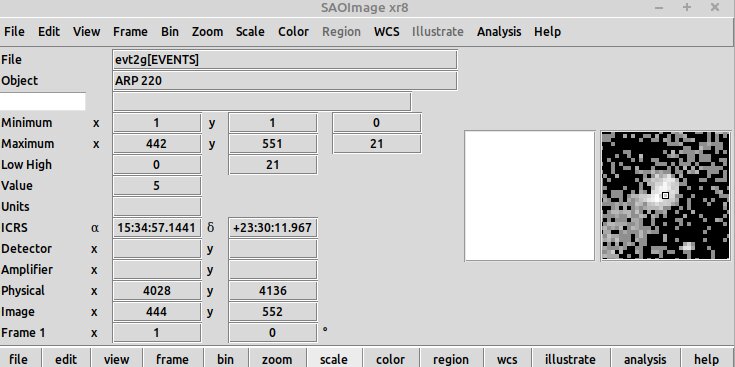
Info panel
The info panel is laid out as a two column (name, value) table; the left hand (name) column contains variable names and the right hand (value) column contains their values. In some rows there are two or three value entries, e.g. (x,y) or (r,g,b). The values are updated dynamically as needed except in infobox freeze mode.
| Command: | - |
| Menu: | - |
| Description: | KEYBOARD SHORTCUT: f. Toggles infobox freeze mode. When set, the info panel no longer updates as youmove the cursor, until you hit f again. |
The variables are:
| Command: | view filename yes|no |
| Menu: | View - Filename |
| Description: | Displays the filename in the info box. On by default. |
| Command: | - |
| Menu: | Edit - Preferences - General - Info Box - Filename format |
| Description: | allows some control over how the info box filename is presented(choices are 'root base', 'full base', 'root' and 'full'.) |
| Command: | view info yes|no |
| Menu: | View - Information Panel |
| Description: | The `view info no' command allows the user to blank out the entire info pane. |
| Command: | view object yes|no |
| Menu: | View - Object |
| Description: | The object name, from the OBJECT keyword in the FITS header. On by default. |
| Command: | view keyword yes|no keyvalue [keywordname] |
| Menu: | View - Keyword |
| Description: | Adds a new row with a text box in the name column with the name ofa keyword. The GUI command allows the user to type the name of a keyword; the valueis then populated in the corresponding row in the value column. Only one keyword can be added in this way. |
| Command: | view minmax yes|no |
| Menu: | View - Min Max |
| Description: | If the minimum and maximum pixel value in the currently loaded image segment are MIN and MAX and those pixels areat image coords (XMIN, YMIN) and (XMAX, YMAX), the Minimum row displays XMIN, YMIN, MIN and the Maximum row displays XMAX, YMAX, MAX. Off by default. |
| Command: | view lowhigh yes|no |
| Menu: | View - Low High |
| Description: | A 'Low High' row is added showing MIN and MAX (but not their locations). Off by default. |
| Command: | - |
| Menu: | - |
| Description: | Value - the pixel value at the current cursor position.There is no associated command for this, it is always on.For an RGB image, r,g,b pixel values are all given.KEYBOARD SHORTCUT: c. Prints current mouse coordinates and pixel value. |
| Command: | view units yes|no |
| Menu: | View - Units |
| Description: | The value of the BUNIT keyword is displayed. Off by default |
| Command: | view wcs yes|no |
| Menu: | View - WCS |
| Description: | WCS - the world coordinate values at the current cursor position for the default WCS for the dataset.When the box is active (the cursor is in the main window) the word 'WCS' in the name column is overridden with the WCS coordinate system name,e.g. 'ICRS', and suitable coordinate names - e.g. α, δ - are displayed next to each value. |
| Command: | view multi yes|no [coordsys] yes|no |
| Menu: | View - Multiple WCS - [coordsys] |
| Description: | Rows for the additional secondary WCS systems, if present, may be added. See discussion of coordinates. For example,view multi yes view wcsg yes or View - Multiple WCS - WCS gadds a row for secondary WCS 'g'. |
| Command: | view physical yes|no |
| Menu: | View - Physical |
| Description: | The x,y physical coordinates at current position, see discussion of coordinates. On by default. |
| Command: | view image yes|no |
| Menu: | View - Image |
| Description: | The x,y image coordinates at current position, see discussion of coordinates. On by default. |
| Command: | view detector yes|no |
| Menu: | View - Detector |
| Description: | The x,y detector coordinates at current position, see discussion of coordinates. Off by default. |
| Command: | view amplifier yes|no |
| Menu: | View - Amplifier |
| Description: | The x,y amplifier coordinates at current position, see discussion of coordinates. Off by default. |
| Command: | view frame yes|no |
| Menu: | View - Frame Information |
| Description: | If multiple frames are displayed, 'Frame 1' or 'Frame 2', etc. is displayed to indicate which frame is selected. |
Info box with all 'view' options selected'
Button bar
| Command: | view buttons yes|no |
| Menu: | View - Buttons |
| Description: | Controls whether the button bar area is visible or not. |
Mouse actions
The mouse button bindings depend on the `edit mode'. This can be set from the Edit menu or with the 'mode' argument on the DS9 command line, e.g., `ds9 -mode region'.
In the default "None" edit mode,
- Mouse motion will update the coordinates and pixel value info display.
- Left button is not active.
- Middle button pans the image (i.e. moves around the display region within the memory region).
Clicking and releasing the middle button will shift the whole image within the frame. See 'Pan' section.
- Right button changes the colorbar bias (left-right motion) and contrast (up-down motion)
The left button (button 1) modes are descibed in the relevant sections but here is a summary:
| Mode | Behaviour |
| None | No action |
| Region | Create and edit regions |
| Crosshair | Hold down to move crosshair |
| Colorbar | Hold and drag to change colormap contrast and bias |
| Pan | Click or drag to pan to location or move location |
| Zoom | Zoom in centered to current location |
| Rotate | Hold and drag to rotate image |
| Crop | Click and hold to select one corner, drag and release to select opposite corner for crop rectangle |
| Catalog | Click on source to select and highlight in catalog table |
| Examine | Simulate IRAF examine |
| Illustrate | Create and edit regions for illustration |
| 3D | Click and drg to rotate the face of the cube |
| Command: | - |
| Menu: | - |
| Description: | KEYBOARD SHORTCUT: k (or up-arrow): move cursor up one pixel, and move selected regions up one pixel.If in crosshair mode, moves crosshair up one pixel. If in pan mode, pans image up one pixel. |
| Command: | - |
| Menu: | - |
| Description: | KEYBOARD SHORTCUT: l (or right-arrow): move cursor right one pixel, and move selected regions right one pixel.If in crosshair mode, moves crosshair right one pixel. If in pan mode, pans image right one pixel. |
| Command: | - |
| Menu: | - |
| Description: | KEYBOARD SHORTCUT: h (or left-arrow): move cursor left one pixel, and move selected regions left one pixel.If in crosshair mode, moves crosshair left one pixel. If in pan mode, pans image left one pixel. |
| Command: | - |
| Menu: | - |
| Description: | KEYBOARD SHORTCUT: j (or down-arrow): move cursor down one pixel, and move selected regions down one pixel.If in crosshair mode, moves crosshair down one pixel. If in pan mode, pans image down one pixel. |
Taking Notes
| Command: | notes open |
| Menu: | File - Notes |
| Description: | Displays a window in which the user can type notes. |
| Command: | notes append [text] |
| Menu: | - |
| Description: | Append a line of text to the end of the notes. Any directly typed notes will be lost. |
| Command: | notes insert [text] |
| Menu: | - |
| Description: | Append a line of text to the top of the notes. Any directly typed notes will be lost. |
| Command: | notes save [filename] |
| Menu: | File - Notes - File - Save |
| Description: | Save the notes to disk.N.B. Notes are also saved and restoredwith DS9's backup functionality. |
| Command: | notes load [filename] |
| Menu: | File - Notes - File - Open |
| Description: | Open a saved notes file |
| Command: | - |
| Menu: | File - Notes - File - Print |
| Description: | Print the notes |
Startup file
DS9 startup files are not typically used by typical users but are implemented by a few observatories with specialized use of DS9. You are recommended instead to explicitly source a TCL script if you need that sort of customization.
The startup file $HOME/.ds9.ini, if present, contains TCL commands that are executed at the end of DS9 initialization. This capability is used by some observatories to customize DS9 for different instruments.
You can get multiple customized startup files by soft-linking DS9 to different executable names or by using the -title command line option. For example if you do
cd /usr/local/bin
ln -s ds9 MegaCamRun
to make a soft link called "MegaCamRun", then executing /usr/local/bin/MegaCamRun will look for an initialization file $HOME/.MegaCamRun.ini
Alternatively running
ds9 -title MegaCamRunwill do the same thing.
Preferences files
Preference files allow the user to customize the appearance and behavior of the GUI . Please note: some preferences take effect immediately, while others require DS9 to be restarted.
User preferences files are stored in the directory $HOME/.ds9. DO NOT EDIT these files, since they may be deleted or overwritten by DS9. They consist of TCL commands to configure DS9.
Users may have several different preference files. DS9 looks for a preference file with its own name. By default, if the application is named ds9, it will look for .ds9. However, if the DS9 application is named foo, or is run with the command line option 'ds9 -title foo', then DS9 will look for .foo. In this manner, the user can have several predefined preference files that are activated by invoking DS9 with a different application names. The same applies to .ds9.ini initialization files.
| Command: | prefs save |
| Menu: | Edit - Preferences - Save |
| Description: | Saves the current preferences to a file .ds9/ds9.8.7.prf in the user's home directory(for DS9 version 8.7; the version number will depend on the version of DS9 in use). This file will be automatically loadedat next startup. The edit preferences dialog window is closed when a save is performed. The .prf file is an ASCII text file with DS9 TCL commands. |
| Command: | prefs clear |
| Menu: | Edit - Preferences - Clear Preferences |
| Description: | Resets preferences to their defaults. |
General customization - look and feel
| Command: | title [name] |
| Menu: | - |
| Description: | Give ds9 a title (available on command line only). This title can be used to address the DS9 instance with xpa; useful when multiple ds9 instances are running.Example:ds9 -title imager1 &; ds9 -title imager2 &; xpaset -p imager1 fits foo.fits |
| Command: | language locale|da|de|es|en|fr|ja|pt |
| Menu: | Edit - Preferences - General - Font - Language |
| Description: | localizes the dialogs to a given language (default - English; a limitednumber of languages are available.) Example: ds9 -language fr. |
| Command: | msg [directory] |
| Menu: | - |
| Description: | Load a directory of translation tables. Example: ds9 -msg /share/ds9/msgs. The existing language support is in the source treeat SAOImageDS(/ds9/msgs) |
| Command: | width|height [value] |
| Menu: | Frame - Frame Parameters - Display Size |
| Description: | allows the user to command a change in the DS9 main image paneto the specified number of x and y pixels. The display can also be changed with mouse draggin under the usualwindow managers. |
| Command: | prefs open |
| Menu: | Edit - Preferences |
| Description: | brings up a dialog window to control program settings. |
| Command: | prefs close |
| Menu: | Edit - Preferences - Close |
| Description: | Closes the dialog window. |
| Command: | - |
| Menu: | Edit - Preferences - General - Enable Confirmation Dialogs |
| Description: | controls whether certain actions resultin a confirmation dialog popping up. On by default. |
| Command: | - |
| Menu: | Edit - Preferences - General - Font - GUI |
| Description: | allows the font used in the GUI to be controlled. Default is Helvetica 9 normal roman. |
| Command: | - |
| Menu: | Edit - Preferences - General - Font - Text |
| Description: | allows the font used in text dialogs to be controlled. Default is Courier 9 normal roman. |
| Command: | prefs theme [value] |
| Menu: | Edit - Preferences - General - Color - Theme |
| Description: | Allows selection of different window manager themes.Example - prefs theme radiance. |
| Command: | prefs nan color [value] |
| Menu: | Edit - Preferences - General - Color - Blank/Inf/NaN color |
| Description: | Controls what color will be used to display pixels with value BLANK, INF or NaN. |
| Command: | prefs bg color yes|no |
| Menu: | Edit - Preferences - General - Color - Use background color instead of theme color |
| Description: | Controls what color will be used for the areas of the DS9 window that have menus and buttons. |
| Command: | prefs bg color [value] |
| Menu: | Edit - Preferences - General - Color - Background color |
| Description: | Controls what color will be used for parts of the main window outside the image.Default is white. |
| Command: | - |
| Menu: | Edit - Preferences - General - Dialog Box - Motif/Windows |
| Description: | allows choice of Motif style or Windows style for dialog boxes. |
| Command: | - |
| Menu: | Edit - Preferences - General - Dialog Box - Center Dialogs |
| Description: | if set, will ensure dialogs are centered. |
| Command: | - |
| Menu: | Edit - Preferences - General - Dialog Box - Default All Files |
| Description: | In file open dialogs, all files are shown by default, not just those with the'right' extensions. Only works for Linux. |
| Command: | - |
| Menu: | Edit - Preferences - Menus and Buttons |
| Description: | allows the user to control which menu items are selected by default, and whichmenu items appear on the button bar in the relevant mode. |
| Command: | - |
| Menu: | Edit - Preferences - General - Autoload FITS regions |
| Description: | Controls autoloading and display of FITS region extensions present in the same fileas the main data being opened. |