Control and Interprocess communication - TCL, XPA and SAMP
Batch mode
It is possible, but cumbersome, to use DS9 in batch mode without a physical display. DS9 is written as an interactive, window client program, and as a result, does require a window server to be available for rendering (X11, Windows, or MacOSX). Under X11, we recommend using xvfb for batch mode. You set up a virtual display buffer, reset your DISPLAY variable, then invoke DS9 with a number of command line options or use xpa from a shell script as a batch processor. Example:
% export DISPLAY=:1
% Xvfb :1 -screen 0 1024x768x16 &
% ds9 -file cmap.fits -zoom to fit -cmap b -grid skyformat degrees -grid yes -regions ../EMS-names.reg -saveimage png mytest.png -exit
HTTP access
Edit - Preferences - HTTP supports definition of a proxy host and its settings for those functions that perform HTTP requests.
TCL scripting
| Command: | console |
| Menu: | File - Open TCL console |
| Description: | Displays a window in which the user can enter low level TCLcommands that will be passed to the DS9 intepreter and executed. The console window has a lot of menu optionsfor fine control, none of which are currently documented. |
| Command: | source [filename] |
| Menu: | File - Source TCL |
| Description: | Allows the user to open a .tcl file whose contents will bepassed to the DS9 interpreter and executed. |
| Command: | tcl [string] |
| Menu: | - |
| Description: | Execute a single TCL command. Only works if XPA_METHOD is 'local'.Example: `xpaset -p ds9 tcl {puts {Hello, World}}' |
XPA
At startup, by default, the XPA and SAMP systems are initialized.
DS9 uses XPA for interprocess communication. When DS9 starts, XPA initializes itself. XPA uses either IP sockets or UNIX sockets, based on whether your machine is configured to connect to the internet or not. In the case where your machine is configured for the internet, but you are not currently connected, XPA gets very confused. So, you can define a shell variable, XPA_METHOD, that tells XPA which method to use.
The default XPA_METHOD = "inet" will use internet based sockets and allow access from other machines. XPA_METHOD = "local" uses local UNIX sockets, most useful when you are not connected to the internet.
| Command: | xpa info |
| Menu: | File - XPA - Information |
| Description: | Pops up a window that gives information about the XPA message bus. |
| Command: | xpa connect|disconnect |
| Menu: | File - XPA - Connect / Disconnect |
| GUI Default: | Edit - Preferences - Startup - Initialize XPA |
| Description: | Connect or disconnect to XPA xpans server |
XPA Scripting
XPA (X Public Access) is a messaging system which provides communication between Unix programs through a set of access points. The two most common actions are retrieving information (xpaget) and issuing commands (xpaset). For more information, see the XPA Messaging System page and the XPA Access Points section of the DS9 manual.
XPA commands may be issued one at a time from the terminal or collected in a script to run in batch mode. Unlike the command line syntax, there is no predetermined stopping point - commands may be sent to DS9 as long as the GUI is open.
First, open DS9 with the data file:
unix% ds9 acisf05005N002_evt2.fits &
The xpans name server is used to manage the names and ports of XPA access points. Use "xpaget xpans" to see the list of available access points:
unix% xpaget xpans
DS9 ds9 gs /tmp/.xpa/DS9_ds9.22972 username
Now that DS9 is running and linked to an XPA server, we can use xpaset to modify the display and add contours. The xpaset -p command is used to set DS9 parameters. (xpaset on its own passes data such as an image; the p option is for passing parameters with no data).
unix% xpaset -p ds9 bin about 3800 3800
unix% xpaset -p ds9 bin factor 2
unix% xpaset -p ds9 scale log
unix% xpaset -p ds9 cmap b
unix% xpaset -p ds9 contour yes
unix% xpaset -p ds9 contour limits 1 100
unix% xpaset -p ds9 contour smooth 5
unix% xpaset -p ds9 contour nlevels 6
unix% xpaset -p ds9 contour save xpa.con
unix% xpaset -p ds9 contour copy
unix% xpaset -p ds9 dssao A2142
unix% xpaset -p ds9 cmap grey
unix% xpaset -p ds9 contour paste
unix% xpaset -p ds9 frame first
unix% xpaset -p ds9 match frames wcs
This command line produces the figure shown.
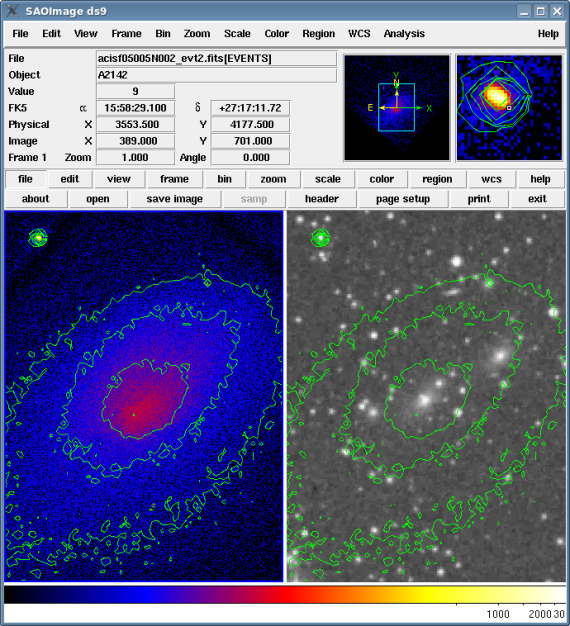
Result of the second example contouring command line
The commands are:
| 1 | bin about 3800 3800 | center the image display at (x,y)=(3800,3800) |
| 2 | bin factor 2 | bin the data by a factor of 2 |
| 3 | scale log | set the display to log scale |
| 4 | cmap b | use the "b" colormap |
| 5 | contour yes | display contours |
| 6 | contour limits 1 100 | set the minimum and maximum contour limits |
| 7 | contour smooth 5 | set contour smoothness to "5" |
| 7 | contour nlevels 6 | create six contour levels |
| 9 | contour save xpa.con | save the contours to the file "xpa.con" |
| 10 | contour copy | copy the x-ray contours |
| 11 | dsssao A2142 | retrieve a DSS image of A2142 from the DSS-SAO server (there are also "dsseso" and "dssstsci" options) |
| 12 | cmap grey | use the "grey" colormap in the DSS frame |
| 13 | contour paste | paste the x-ray contours onto the optical data |
| 14 | frame first | select the first ds9 frame |
| 15 | match frames wcs 7 match the WCS of the DSS frame to the current (x-ray) frame |
| Command: | cd [filename] |
| Menu: | - |
| Description: | Set the current working directory used for file open/save dialogs |
XPA Remote commands
You can command DS9 on one machine with XPA commands sent from another machine. XPA uses port 14285 by default.
| Command: | acl [client] + |
| Menu: | - |
| Description: | Grant client access to server |
Suppose that DS9 is running on a machine called kirk.harvard.edu and you want to control it from another machine called spock.harvard.edu.
Example: on kirk.harvard.edu, type:
xpaset -p ds9 -acl spock.harvard.edu +
This can be set up in advance by clearing a /home/[user]/acls.xpa file on kirk.harvard.edu containing the line
DS9:ds9 spock.harvard.edu +
On the client side (spock), the client needs to communicate with the xpansname server program on the server machine (kirk) to find the XPA server communication info. This can be done in two ways:
On spock.harvard.edu, type
setenv XPA_NSINET 'kirk.harvard.edu:14285'
or
xpaget -i 'kirk.harvard.edu:14285' ds9
You should now be able to type xpaset commands on spock that will change the state of the DS9 running on kirk.
SAMP
SAMP is a messaging protocol that enables astronomy software tools to interoperate and communicate. SAMP-enabled tools include TOPCAT, SAOImageDS9, Aladin, and Astropy. SAOImageDS9 SAMP support is available for all ports of DS9, including linux, MacOS, and Windows.
Broadly speaking, SAMP is an abstract framework for loosely-coupled, asynchronous, RPC-like and/or event-based communication, based on a central service providing multi-directional publish/subscribe message brokering. The message semantics are extensible and use structured but weakly-typed data. For more information on SAMP, please see https://www.ivoa.net/documents/SAMP/
SAMP defines a number of message types, or MTYPEs, which are common among SAMP tools, such as image.load.fits, table.load.votable, coord.pointAt.sky. These messages allow images and tables to be exchanged between tools.
The samp implementation for DS9 is based on the XPA model with 2 additional SAMP MTYPEs, ds9.get and ds9.set, each with a required 'cmd' string argument and an optional 'url' string argument. They return either OK or ERROR and a value or error text.
Any SAOImageDS9 function that can be invoked via the command line can also be invoked via SAMP.
ds9.set may be called via notification, call and call/wait. ds9.get can only be called via call and call/wait. Most of the ds9.get calls return a value string, but a few will return a url instead.
DS9 SAMP setup commands are:
| Command: | samp broadcast image|table |
| Menu: | File - SAMP - Image/Table - Broadcast - (name) |
| Description: | Broadcast image or table to the target DS9 process with the given process name (started with ds9 -title).The current image/table in the source DS9 will then be set to the target DS9 and displayed there. |
| Command: | samp connect|disconnect |
| Menu: | File - SAMP - Connect/Disconnect |
| GUI Default: | Edit - Preferences - Startup - SAMP Connect |
| Description: | SAMP disconnect and connect |
| Command: | - |
| Menu: | Edit - Preferences - Startup - SAMP WebHub Start |
| Description: | on by default; initializes SAMP at startup. |
| Command: | samp send image|table [application] |
| Menu: | - |
| Description: | SAMP send data to application. Example: samp send table topcat |
| Command: | samp hub info |
| Menu: | File - SAMP Hub - Information |
| Description: | Send info to SAMP |
| Command: | samp hub start|stop |
| Menu: | File - SAMP Hub - Start/Stop |
| GUI Default: | Edit - Preferences - Startup - SAMP Hub Start |
| Description: | Start/stop samp hub |
SAMP's calls to DS9 make use of the DS9 command syntax. For example:
ds9.set("contour clear")
ds9.set("contour generate")
ds9.set("contour load ds9.ctr")
See the Astropy section for usage that is more likely to be immediately useful to the user.
Astropy
You can control DS9 from Astropy by using the SAMP interface.
We assume you have not already started a SAMP hub in python and that we will be using the SAMP hub that DS9 initializes when it starts up. In this case, the SAMP hub internal ID of the DS9 client is always "c1". The ecall_and_wait method we will use has as its third argument a timeout argument in seconds; we will use a 10 second timeout. (In other words, if you are not a SAMP expert and you are only using it in DS9, then always use `ds9.ecall_and_wait("c1","ds9.set","10",cmd="whatever")' and just change the cmd= bit.)
- Import the SAMP client in astropy, create an instance of the client, and connect to SAOImageDS9's SAMP hub:
py> from astropy.samp import SAMPIntegratedClient
py> ds9 = SAMPIntegratedClient()
py> ds9.connect()
- Issue either ds9.set or ds9.get to invoke DS9 API functions using the ecall_and_wait command. Note that all arguments
are strings and must be in quotes. This example shows how to set up an RGB image.
py> ds9.ecall_and_wait("c1","ds9.set","10",cmd="rgb") py> ds9.ecall_and_wait("c1","ds9.set","10",cmd="rgb red") py> ds9.ecall_and_wait("c1","ds9.set","10",cmd="url http://ds9.si.edu/download/data/673nmos.fits") py> ds9.ecall_and_wait("c1","ds9.set","10",cmd="zscale") py> ds9.ecall_and_wait("c1","ds9.set","10",cmd="rgb green") py> ds9.ecall_and_wait("c1","ds9.set","10",cmd="url http://ds9.si.edu/download/data/656nmos.fits") py> ds9.ecall_and_wait("c1","ds9.set","10",cmd="zscale") py> ds9.ecall_and_wait("c1","ds9.set","10",cmd="rgb blue") py> ds9.ecall_and_wait("c1","ds9.set","10",cmd="url http://ds9.si.edu/download/data/502nmos.fits") py> ds9.ecall_and_wait("c1","ds9.set","10",cmd="zscale") py> ds9.ecall_and_wait("c1","ds9.set","10",cmd="rotate 270") py> ds9.ecall_and_wait("c1","ds9.set","10",cmd="zoom to fit") - Disconnect the DS9 client
py> ds9.disconnect()
Some more examples:
A 3D data cube GIF movie:
py> from astropy.samp import SAMPIntegratedClient
py> ds9 = SAMPIntegratedClient()
py> ds9.connect()
py> ds9.ecall_and_wait("c1","ds9.set","10",cmd="3d")
py> ds9.ecall_and_wait("c1","ds9.set","10",cmd="url http://ds9.si.edu/download/data/image3d.fits")
py> ds9.ecall_and_wait("c1","ds9.set","10",cmd="cmap viridis")
py> ds9.ecall_and_wait("c1","ds9.set","10",cmd="movie 3d gif 3d.gif number 10 az from -90 az to 90 el from 45 el to 45 zoom from 4 zoom to 4 oscillate 1")
py> ds9.disconnect()
Use of the imexam task. This example illustrates the use of imexam, which queries the user to click the mouse and returns the coordinates at that location of the image in astropy:
py> from astropy.samp import SAMPIntegratedClient
py> ds9 = SAMPIntegratedClient()
py> ds9.connect()
py> ds9.ecall_and_wait("c1","ds9.set","10",cmd="url http://ds9.si.edu/download/data/img.fits")
py> ds9.ecall_and_wait("c1","ds9.set","10",cmd="zscale")
py> print('Click anywhere in image:')
py> coord = ds9.ecall_and_wait("c1","ds9.get","0",cmd="imexam wcs icrs")
py> print('Coordinate is ', coord['samp.result']['value'])
py> ds9.disconnect()
Displaying a 2D numpy array in DS9:
This example shows how to display the contents of a numpy array as an image within SAOImageDS9. First, create your numpy array and fill it with values. Next, create a numpy memmap array and copy the contents of the original array. Now flush the content to a file on disk. Next load the filename into DS9, it will display the initial contents. Now update the numpy memmap array with new values, and flush to disk. Use the command update to inform SAOImageDS9 to update the screen with the new data values. Continue this flush / update cycle. Be sure to clear the SAOImageDS9 frame before deleting the memmap file.
py> from tempfile import mkdtemp
py> import os.path as path
py> filename = path.join(mkdtemp(), 'newfile.dat')
py> import numpy as np
py> aa = np.random.rand(1024,2048)
py> fp = np.memmap(filename, dtype='float32', mode='w+', shape=(1024,2048))
py> fp[:] = aa[:]
py> fp.flush()
py> from astropy.samp import SAMPIntegratedClient
py> ds9 = SAMPIntegratedClient()
py> ds9.connect()
py> ds9.ecall_and_wait("c1","ds9.set","10",cmd="array "+ filename +"[xdim=1024,ydim=2048,bitpix=-32]")
py> aa = np.random.rand(1024,2048)
py> fp[:] = aa[:]
py> fp.flush()
py> print("pause 1")
py> import time
py> time.sleep(2)
py> ds9.ecall_and_wait("c1","ds9.set","10",cmd="update")
py> print("pause 2")
py> time.sleep(2)
py> ds9.ecall_and_wait("c1","ds9.set","10",cmd="frame clear")
py> ds9.disconnect()
py> import os
py> os.remove(filename)
Web browser and VO
DS9 contains a simple web browser used to access documentation and other internally needed network documents.
| Command: | web |
| Menu: | Analysis - Web browser |
| Description: | Starts a copy of the browser for use by the user, although it seemsunlikely that this capability is useful on its own. |
| Command: | web [url] |
| Menu: | - |
| Description: | Opens web browser at given URL |
| Command: | web new [tag] [url] |
| Menu: | - |
| Description: | Opens new instance of web browser with given name |
| Command: | web [tag] click [n] |
| Menu: | - |
| Description: | Click n times |
| Command: | web [tag] click back|forward|stop|reload |
| Menu: | - |
| Description: | Web page navigation |
| Command: | web [tag] clear |
| Menu: | - |
| Description: | Clear given web browser |
| Command: | web [tag] close |
| Menu: | - |
| Description: | Close given web browser |
DS9 capabilities provides access to some VO analysis. DS9 supports access to the Rutgers X-ray analysis server in this way.
| Command: | vo open |
| Menu: | Analysis - Virtual Observatory |
| Description: | Brings up a VO dialog.After waiting some time the dialog is populated with VO options, currently the useful one is the Rutgers X-ray analysis.Select primary MOOC server; this brings up an internal web browser window with the Rutgers Chandra-Ed data.Clicking on one of the observation titles causes that data to be loaded into ds9. |
| Command: | vo connect|disconnect chandra-ed |
| Menu: | - |
| Description: | Connect or disconnect from the Rutgers Chandra-Ed server |
| Command: | vo internal |
| Menu: | Edit - Preferences - VO - Browser - Use Internal Web Browser |
| Description: | sets a default value; |
| Command: | vo server [url] |
| Menu: | Edit - Preferences - VO - VO Server |
| Description: | sets a default value giving the list of known servers. |
| Command: | vo delay [value] |
| Menu: | Edit - Preferences - VO - Keep-Alive |
| Description: | sets a default value of 15 minutes. |
If you can't connect to VO services, it may be a problem with network firewalls. In this case you can use DS9's internal browser and a web proxy connection.
When you click on one of the Virtual Observatory servers in the VO list, DS9 will attempt to connect to that server and (if the internal Web display is enabled) display its Web page. The square box to the left of the server name turns yellow while the connection is being established and then green to signal success.
A direct connection is fast and flexible. Among other things, it allows you to perform analysis on your own local data (the VO server will retrieve the image from DS9) and also allows you to use an external browser to load images.
Some system managers configure their firewall explicitly to prevent computers in their care from making a direct connection to an external host. Instead, they only allow external access through a Web proxy server (such as SOCKS). If you are using a computer behind a restricted firewall of this sort, then DS9 will not be able to connect directly to a VO server. The yellow box will not turn green and eventually DS9 will display an error message.
In this case, you can choose to have DS9 communicate with the VO servers through your Web proxy server. DS9 will use your proxy to send its commands and retrieve its data and analysis results, rather than doing this directly. Note that the following restrictions apply:
- The transfer of data is slower.
- You must use the internal Web browser for loading images, etc.
- You cannot perform analysis on local data.
- There is a (large but finite) restriction on the number of annuli, and number of polygon points you can specify in a region, as well as the total number of regions allowed.
If your computer and firewall have been configured to require use of a Web proxy server, you will have to tell DS9 about this server. Click the Configure Web Proxy button and type the relevant information into the boxes. (Your systems administrator will be able to tell you the details.) At this point, you should be able to connect to a VO server successfully. Please let us know if you have problems!
A final note: you may, of course, choose to use the Web proxy even if your computer and firewall are configured to allow direct connections. In this case, there is no need to configure the proxy server.
IRAF support
DS9 retains some support for use within the classic NOAO image processing package IRAF. DS9 for Windows and MacOSX is also a fully functional IRAF display server. To direct image output from IRAF to DS9 running under Windows or MacOSX, use the IMTDEV environment variable, which must be set before entering IRAF. For example, if the machine is named 'foo.bar.edu', type:
$ setenv IMTDEV inet:5137:foo.bar.edu
$ cl
cl> display dev$pix
When DS9 starts, it will look for IRAF configuration files in the following order:
$HOME/.imtoolrc
/usr/local/lib/imtoolrc
$IMTOOLRC
$imtoolrc
If none of these are found it will use the following default configuration:
 1  2  512  512  # imt1|imt512
 2  2  800  800  # imt2|imt800
 3  2 1024 1024  # imt3|imt1024
 4  1 1600 1600  # imt4|imt1600
 5  1 2048 2048  # imt5|imt2048
 6  1 4096 4096  # imt6|imt4096
 7  1 8192 8192  # imt7|imt8192
 8  1 1024 4096  # imt8|imt1x4
 9  2 1144  880  # imt9|imtfs full screen (1152x900 minus frame)
10  2 1144  764  # imt10|imtfs35 full screen at 35mm film aspect ratio
11  2  128  128  # imt11|imt128
12  2  256  256  # imt12|imt256
13  2  128 1056  # imt13|imttall128 tall & narrow for spectro.
14  2  256 1056  # imt14|imttall256 tall & wider for spectro.
15  2 1056  128  # imt15|imtwide128 wide & thin for spectro.
16  2 1056  256  # imt16|imtwide256 wide & fatter for spectro.
17  2 1008  648  # imt17|imtssy Solitaire fmt w/ imtool border
18  2 1024  680  # imt18|imtssn Solitaire fmt w/out imtool border
19  1 4096 1024  # imt19|imt4x1
If the actual configuration of IRAF assumes a different buffer size, images displayed from IRAF will appear corrupted and trigger a series of error messages.
The IRAF graphcap file dev$graphcap must also be consistent with the imtoolrc file used; changes made to dev$graphcap must also be implemented in imtoolrc.
NOAO issued this note, hopefully now obsolete:
In a smooth installation the imtoolrc file is installed as a
/usr/local/lib/imtoolrc symlink pointing to the dev$imtoolrc file in the
iraf system.  This is normally what's used but XImtool (and DS9) also
allow a $HOME/.imtoolrc and IMTOOLRC environment variable defining the
path as fallbacks.  There are several practical problems with  this:
for some reason the imtoolrc link won't be created
if the /usr/local/lib directory doesn't exist when the install script is
run on the machine, even though it's run as root and the file can be
directory easily.  On PC-IRAF systems there is also a typo in the
install script (extra logical or at line 515) which causes it to exit
before the display setup is run (i.e. no /dev fifos or imtoolrc). If
users don't catch this or see it in the README file they'll think
everything went fine.
Note that DS9 uses a different approach to displaying images than the older saoimage and ximtool programs. An additional data buffer is used, which means that while with the older programs you see incremental progress in displaying an image, with DS9 you see nothing for a while and then the image is rendered all at once. The overall time to finish rendering is almost the same. (Nowadays with modern computers it shouldn't usually be an issue anyway).
On very old/slow machines, interactive control of the color gamma/bias is frustratingly slow in 24 bit mode. Instead of changing a color look up table, as in 8 bit mode, DS9 has to update every pixel on the screen. If your cpu speed is slow, you can select the Edit:Preferences:True Colorbar to tell DS9 not to update the entire screen, only a part of the screen.
Some relevant IRAF commands:
- DISPLAY:
The IRAF DISPLAY task can be used to send an image to DS9. IRAF uses one of three communications protocols to do so: fifo, port (socket), and unix domain name. The defaults in DS9 are:
fifo  /dev/imt1
port   5137
unix   /tmp/.IMT%d
If your IRAF installation uses a different configuration, you can accommodate this on the DS9 command line with the following commands (these are only available on the command line and can't be used with XPA or SAMP):
Command: fifo [device] Menu: - Description: Start DS9 with a specified FIFO, e.g., ds9 -fifo /dev/imt2 Command: port [device] Menu: - Description: Start DS9 with a specified port, e.g., ds9 -port 5138 Command: unix [device] Menu: - Description: Start DS9 with a specified IRAF unix name, e.g., ds9 -unix /img/.IMT3 Command: fifo\_only Menu: - Description: Starting with ds9 -fifo_only ignores the port and unix options. Command: port\_only Menu: - Description: Starting with ds9 -port_only ignores the fifo and unix options. Command: unix\_only Menu: - Description: Starting with ds9 -unix_only ignores the port and fifo options. Note that when IRAF sends an image to DS9, it is IRAF that does the color scale distribution, and so in DS9 the Scale menu is not active.
In IRAF's Display, use the ztrans and z1,z2 parameters to set the upper/lower bounds and distribution. You can also use the zscale parameter to auto determine z1,z2.
ztrans=[linear|log|none|user]
z1=min
z2=max
zscale=[yes|no]
What actually is sent from IRAF to DS9 is one byte per pixel, values 0-200, which already has applied both the upper and lower clipping bounds and the distribution. So this is why the SCALE menu is disabled in DS9 when it receives a image from IRAF.
- IMEXAMINE:
Note that if you have many multiple frames in DS9, IMEXAMINE can only address frames with frame numbers 1 to 9.
- MSCZERO:
The mscred package task msczero uses the IRAF IIS image display protocol. But there is a minor issue with it. Before using msczero, type the following in the IRAF cl:
cl> set disable_wcs_maps=""
cl> flpr